BrainDrive Plugin Developer Quick Start
Bring your AI powered ideas to life in 30 minutes or less.
By the end of this guide you will be able to:
- Install and test plugins via Plugin Manager
- Set up a rapid development environment (1-minute build cycles)
- Use Service Bridges to access BrainDrive functionality
- Build, test, and iterate on plugin ideas quickly
Prerequisites
- Node.js 16+ installed
- Git installed
- BrainDrive running locally (Installation Guide)
Phase 1: Verify Your Setup
Before developing, confirm BrainDrive and the plugin system work correctly on your machine.
Step 1: Install the Plugin Template
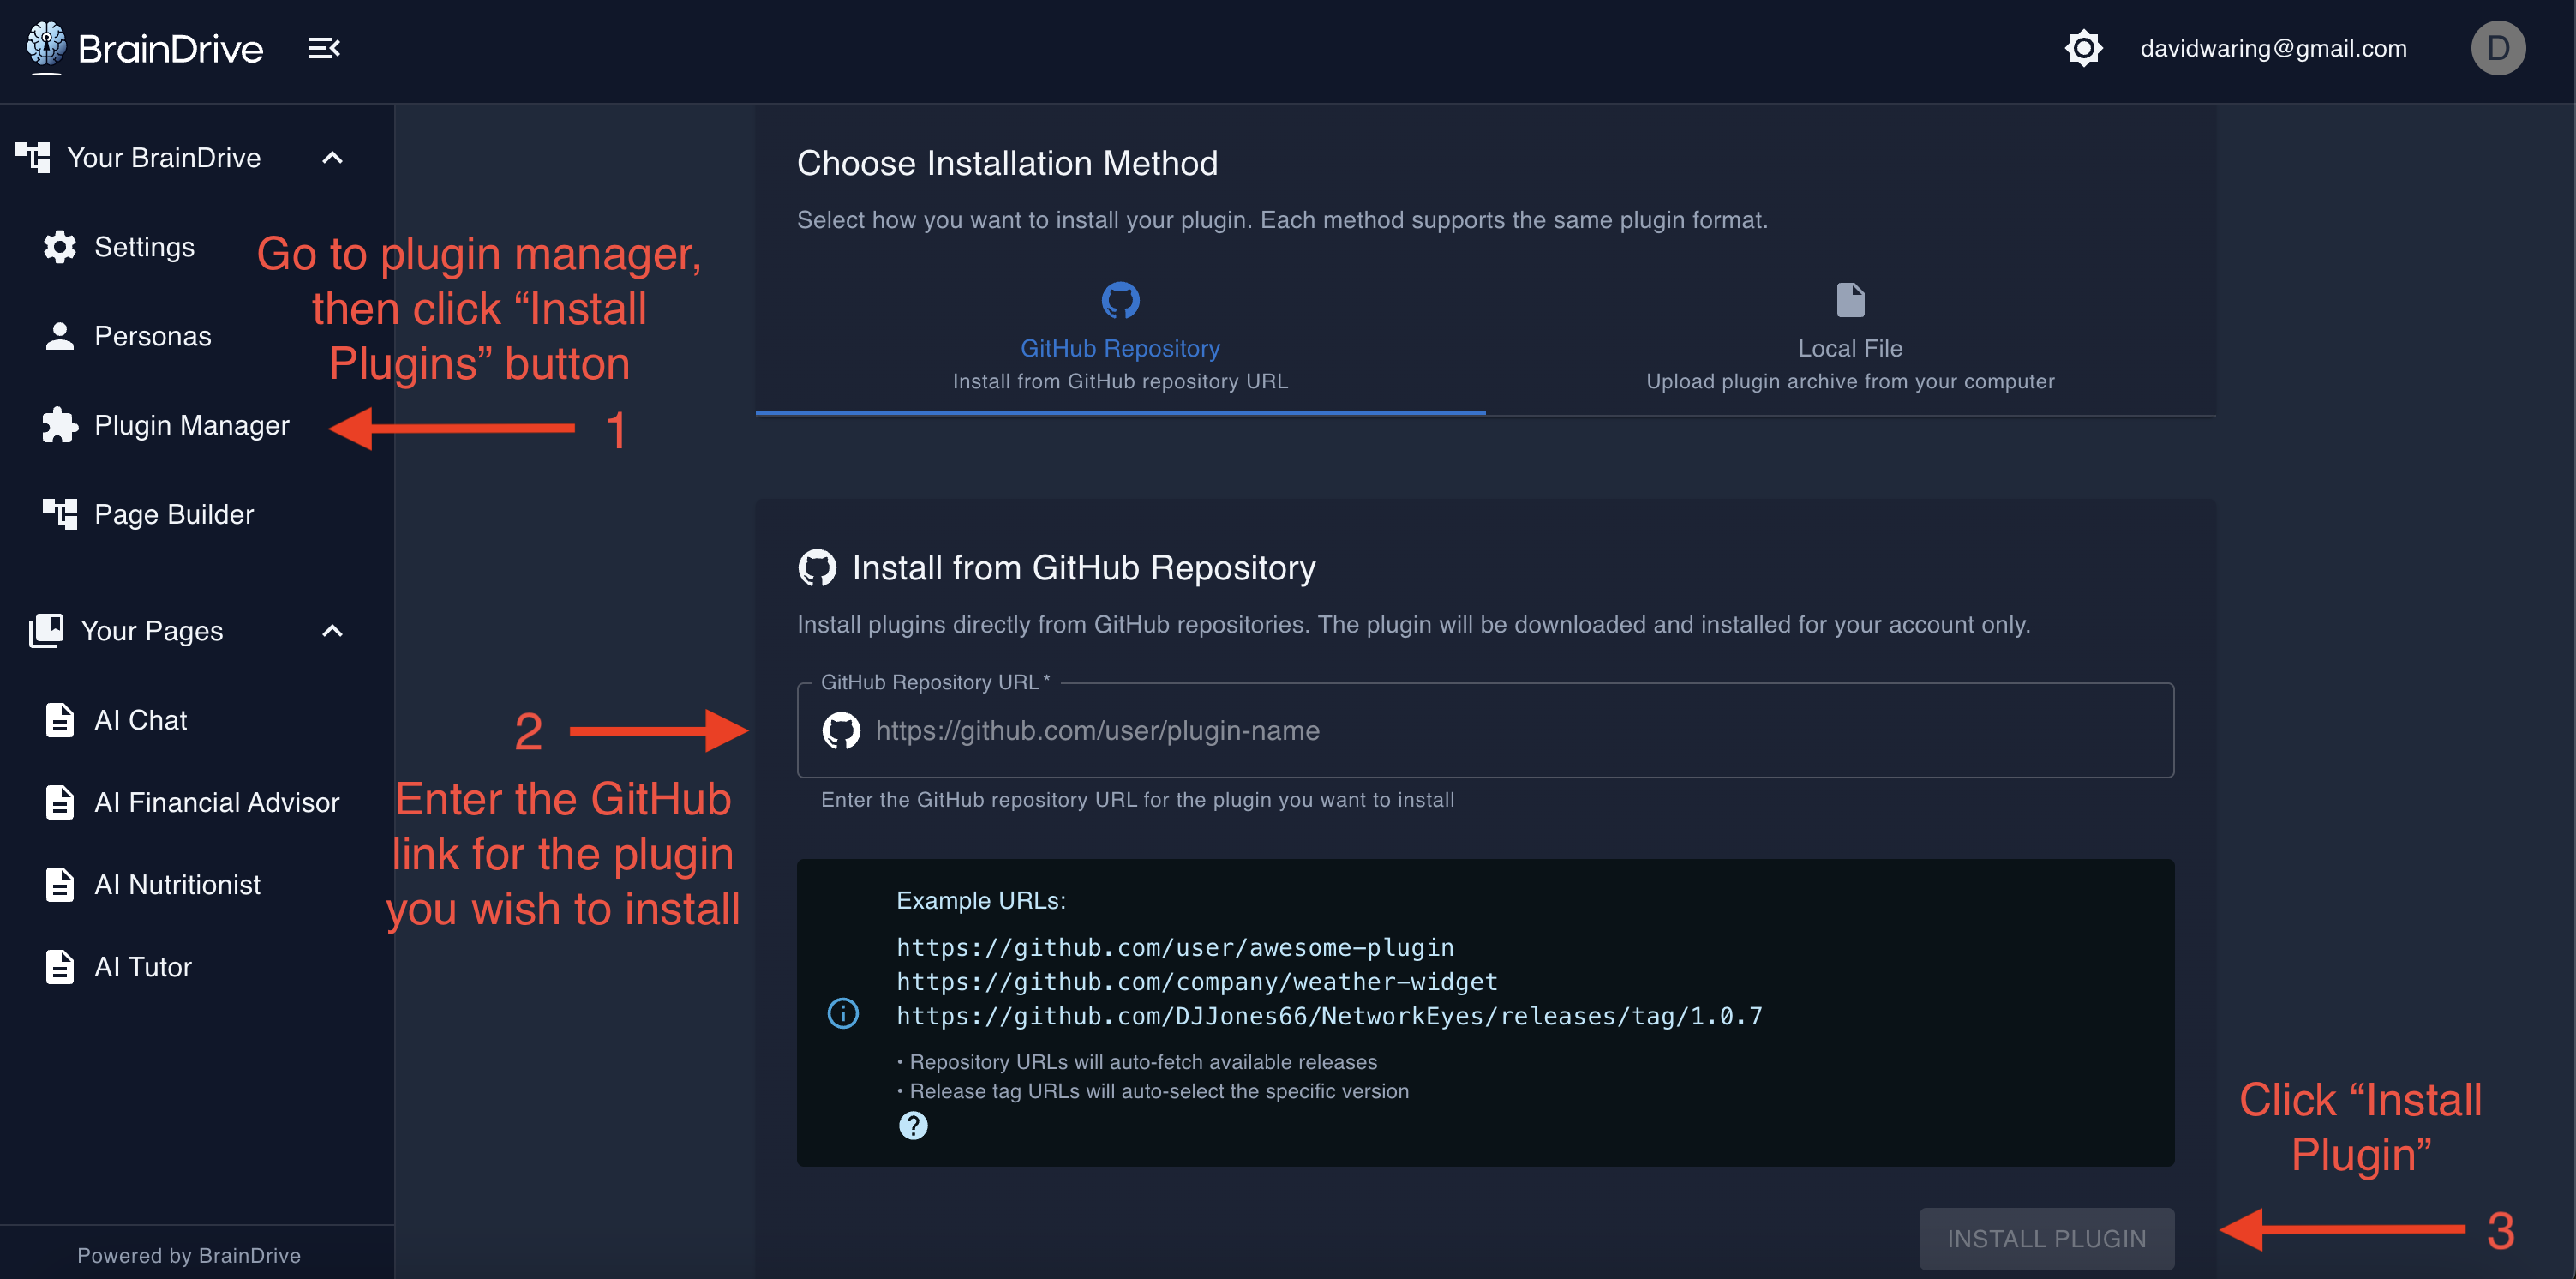
- Open BrainDrive and go to Plugin Manager → Install Plugins
- Enter URL:
https://github.com/BrainDriveAI/BrainDrive-PluginTemplate - Click Install
- Wait for the green success message
Step 2: Test the Template
- Go to Page Builder
- Click Create New Page
- Drag "Plugin Template" from the left panel onto the canvas
- Click Publish
- Navigate to your page — you should see the working plugin
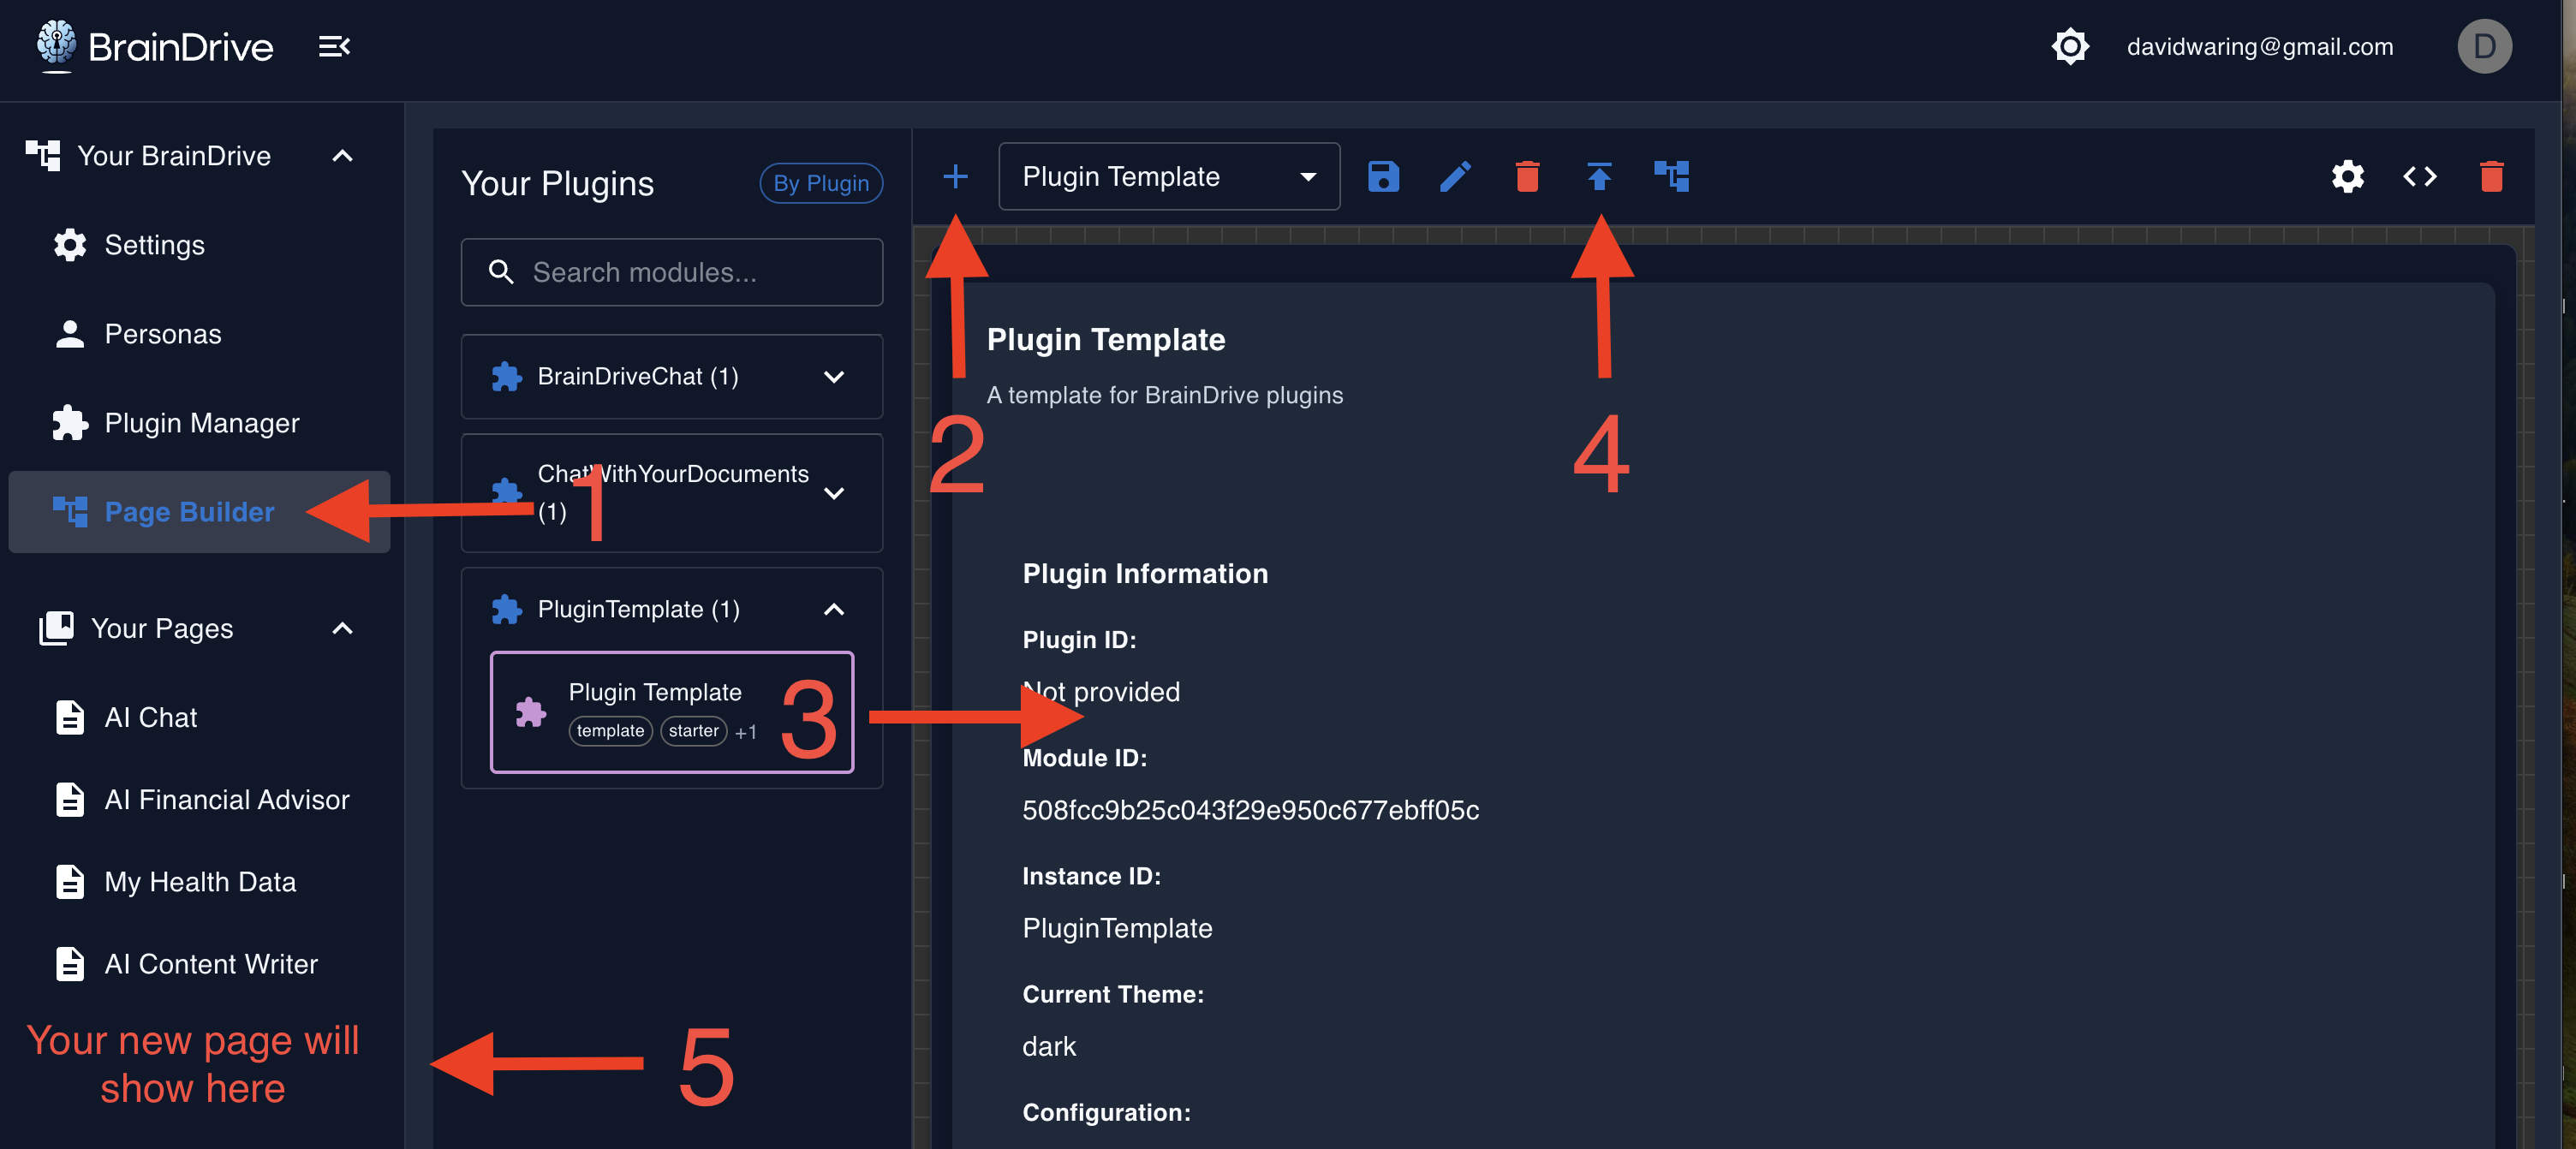
If you see the plugin working, your BrainDrive setup is ready for development.
Phase 2: Set Up Your Plugin
Now you'll create YOUR plugin by cloning a fresh copy of the template and customizing it.
Why clone if you just installed?
- Installing adds a plugin to BrainDrive so you can use it
- Cloning gives you the source code so you can develop and modify it
As a developer, you need both: the installed version proves your setup works, and the cloned version is where you write code.
Step 3: Clone the Template
# In your preferred development folder
git clone https://github.com/BrainDriveAI/BrainDrive-PluginTemplate.git MyAwesomePlugin
cd MyAwesomePlugin
npm install
Step 4: Rename Your Plugin
After cloning, you must rename several files and values to make the plugin your own. This is where most first-time developers get stuck — follow this checklist carefully.
Naming Checklist
| Location | What to Change | Example |
|---|---|---|
| Folder name | Rename the cloned folder | MyAwesomePlugin/ |
| package.json | name, description, version | "name": "my-awesome-plugin" |
| lifecycle_manager.py | slug, name, description | slug = "my-awesome-plugin" |
| lifecycle_manager.py | Component IDs in manifest | "id": "MyAwesomeModule" |
| src/ folder | Rename .tsx file | MyAwesomePlugin.tsx |
| src/ file | Rename class inside the file | class MyAwesomePlugin extends Component |
| webpack.config.js | Module federation name | name: 'my_awesome_plugin' |
| webpack.config.js | Exposed component name | './MyAwesomePlugin': './src/MyAwesomePlugin.tsx' |
| Output folder | Version folder in build path | MyAwesomePlugin/v1.0.0/dist |
Critical Naming Rule
Use different names for your plugin and your module/component.
- Bad: Plugin = "RAG Plugin", Module = "RAG Plugin" (code can't distinguish them)
- Good: Plugin = "RAG Plugin", Module = "RAG Module"
BrainDrive's code needs to tell plugins and modules apart. If they share the same name, you'll encounter confusing errors.
See the Naming Conventions Guide for detailed naming rules.
Step 5: Configure Build Output
To enable fast 1-minute development cycles (instead of 10+ minute reinstall cycles), configure webpack to build directly into BrainDrive's plugin folder.
-
Find your BrainDrive backend path:
[your-braindrive-path]/backend/plugins/shared/ -
Update webpack.config.js:
output: {
  path: path.resolve(__dirname, '/path/to/BrainDrive-Core/backend/plugins/shared/MyAwesomePlugin/v1.0.0/dist'),
  // ... rest of config
} -
Set up browser for cache-free development:
- Open browser DevTools (F12)
- Go to the Network tab
- Check "Disable cache"
- Keep DevTools open while developing
Platform Note
Some developers use symlinks instead of hardcoded paths. Symlinks work on Mac and Linux but are not available on Windows. The direct path approach shown above works on all platforms.
Phase 3: Build and Iterate
Step 6: Make Your First Change
-
Edit your plugin file (e.g.,
src/MyAwesomePlugin.tsx):// Change the title or add some text
render() {
return (
<div>
<h1>My Awesome Plugin is Working!</h1>
</div>
);
} -
Build:
npm run build -
Test:
- Hard refresh your browser (Ctrl+Shift+R or Cmd+Shift+R)
- Your change appears immediately — no reinstallation needed
You've just experienced the 1-minute development cycle!
Phase 4: Use Service Bridges
Service Bridges are BrainDrive's secret sauce. They provide simple, stable APIs for complex operations.
Why Service Bridges matter:
- Zero Dependencies — Your plugins never break when BrainDrive updates
- Simple APIs — Complex backend operations become one-line calls
- Consistent Interface — Same patterns across all BrainDrive features
Available Bridges
| Bridge | Purpose | Example Use | Learn by Doing |
|---|---|---|---|
API | Backend communication | await services.api.get('/data') | API Example |
Event | Plugin messaging | services.event.emit('myEvent', data) | Events Example |
Theme | Light/dark mode | services.theme.getCurrentTheme() | Theme Example |
Settings | User preferences | services.settings.getSetting('key') | Settings Example |
Page Context | Current page info | services.pageContext.getContext() | Context Example |
Plugin State | Data persistence | services.pluginState.save(data) | State Example |
Step 7: Build Something Real
Pick a bridge, test a simple use case, and build something. Don't overthink it.
Example: Hello AI Chat
A complete, working example that sends a message to an AI model:
import React, { Component } from 'react';

interface HelloAIChatProps {
  services: {
    api: {
      post: (url: string, data: object) => Promise<{ data: any }>;
    };
  };
}

interface HelloAIChatState {
  input: string;
  response: string;
  loading: boolean;
}

class HelloAIChat extends Component<HelloAIChatProps, HelloAIChatState> {
  constructor(props: HelloAIChatProps) {
    super(props);
    this.state = {
      input: '',
      response: '',
      loading: false,
    };
  }

  handleInputChange = (e: React.ChangeEvent<HTMLInputElement>) => {
    this.setState({ input: e.target.value });
  };

  handleSend = async () => {
    const { input } = this.state;
    if (!input.trim()) return;

    this.setState({ loading: true, response: '' });

    try {
      const result = await this.props.services.api.post('/api/v1/chat/completions', {
        messages: [{ role: 'user', content: input }],
        model: 'default',
      });

      const aiResponse = result.data.choices?.[0]?.message?.content || 'No response';
      this.setState({ response: aiResponse });
    } catch (error) {
      this.setState({ response: 'Error: Could not get response' });
    } finally {
      this.setState({ loading: false });
    }
  };

  render() {
    const { input, response, loading } = this.state;

    return (
      <div style={{ padding: '20px' }}>
        <h2>Hello AI Chat</h2>
        <input
          type="text"
          value={input}
          onChange={this.handleInputChange}
          placeholder="Ask something..."
          style={{ width: '300px', marginRight: '10px' }}
        />
        <button onClick={this.handleSend} disabled={loading}>
          {loading ? 'Sending...' : 'Send'}
        </button>
        {response && (
          <div style={{ marginTop: '20px', padding: '10px', background: '#f5f5f5' }}>
            <strong>AI Response:</strong>
            <p>{response}</p>
          </div>
        )}
      </div>
    );
  }
}

export default HelloAIChat;
Example: Theme-Aware Widget
React to theme changes using the Theme bridge:
class ThemeAwareWidget extends Component {
  componentDidMount() {
    this.props.services.theme.addThemeChangeListener(this.handleThemeChange);
  }

  componentWillUnmount() {
    this.props.services.theme.removeThemeChangeListener(this.handleThemeChange);
  }

  handleThemeChange = (theme: string) => {
    console.log('Theme changed to:', theme);
    this.forceUpdate();
  };

  render() {
    const theme = this.props.services.theme.getCurrentTheme();
    const isDark = theme === 'dark';

    return (
      <div style={{
        background: isDark ? '#1a1a1a' : '#ffffff',
        color: isDark ? '#ffffff' : '#000000',
        padding: '20px'
      }}>
        Current theme: {theme}
      </div>
    );
  }
}
Example: Cross-Plugin Messaging
Send messages between plugins using the Event bridge:
// Plugin A: Send an event
this.props.services.event.emit('dataUpdate', { newValue: 42 });

// Plugin B: Listen for events
componentDidMount() {
  this.props.services.event.on('dataUpdate', this.handleDataUpdate);
}

handleDataUpdate = (data: { newValue: number }) => {
  console.log('Received update:', data.newValue);
};
See the complete Lifecycle Manager Customization Guide for all customization options.
Step 8: Publish Your Plugin
Once your plugin works, you can share it with others.
Publishing Checklist
-
Push to GitHub (public repository)
git remote set-url origin https://github.com/YOUR-USERNAME/MyAwesomePlugin.git
git push -u origin main -
Create a release (recommended)
- Go to your GitHub repo → Releases → Create new release
- Tag format:
v1.0.0 - Include a description of what the plugin does
-
Share the repo URL
- Others can install via Plugin Manager using your GitHub URL
-
Post to the Plugin Marketplace
- Share your plugin at community.braindrive.ai/c/the-marketplace
Developer Tip
For build automation scripts, check out community resources like Dave's plugin scripts) which include helpers for building and archiving plugins.
Common Gotchas
| Issue | Solution |
|---|---|
| Component not appearing in Page Builder | Check that dist/remoteEntry.js exists; verify manifest in lifecycle_manager.py |
| Changes not showing after build | Verify webpack output path is correct; hard refresh (Ctrl+Shift+R); ensure DevTools "Disable cache" is checked |
| Plugin won't install from GitHub | Ensure repo is public; check for build errors in backend console |
| "Module not found" errors | Run npm install; check import paths match renamed files |
| Same name for plugin and module | Rename one of them — they must be different (see naming rule above) |
| Symlinks not working | Symlinks only work on Mac/Linux; use direct paths on Windows |
| Import path still references old filename | After renaming .tsx files, update the import in src/index.tsx to match |
| CSS import error after rename | Update the CSS import path in your main component file |
| Class name doesn't match filename | Rename the class AND the export default statement inside the file |
| Scope/slug/name mismatch | In lifecycle_manager.py, ensure name, scope, and plugin_slug all match |
Next Steps
- Naming Conventions — Detailed naming rules and patterns
- Theming Guide — Build theme-aware plugins
- Service Bridges API — Complete bridge documentation
- Community Forums — Get help and share plugins
- API Documentation — Backend endpoints (when running locally)
- Report Issues — Use
[plugin]tag
Dave J's Rules for Success
- Test the unmodified template first — Always verify the base works before customizing
- Make incremental changes — Test after each small modification
- Use the 1-minute cycle — Don't fall back to slow reinstall cycles
- Leverage Service Bridge examples — Copy working patterns rather than starting from scratch
- Name things differently — Plugin name ≠ module name
Thank you for joining us on this mission to build a superior, user-owned alternative to Big Tech AI systems.
Your AI. Your Rules.