BrainDrive Plugin Developer Quick Start
Bring your AI powered ideas to life in 30 minutes or less.
By the end of this guide you will be able to:
- Install and test plugins via Plugin Manager
- Set up rapid development environment (1-minute cycles)
- Use Service Bridges to access BrainDrive functionality (saving 90% of development time)
- Build, test, and iterate on plugin ideas quickly
Prerequisites
- Node.js 16+ installed
- Git installed
- BrainDrive running locally
Step 1: Install BrainDrive
Follow the Installation Guide
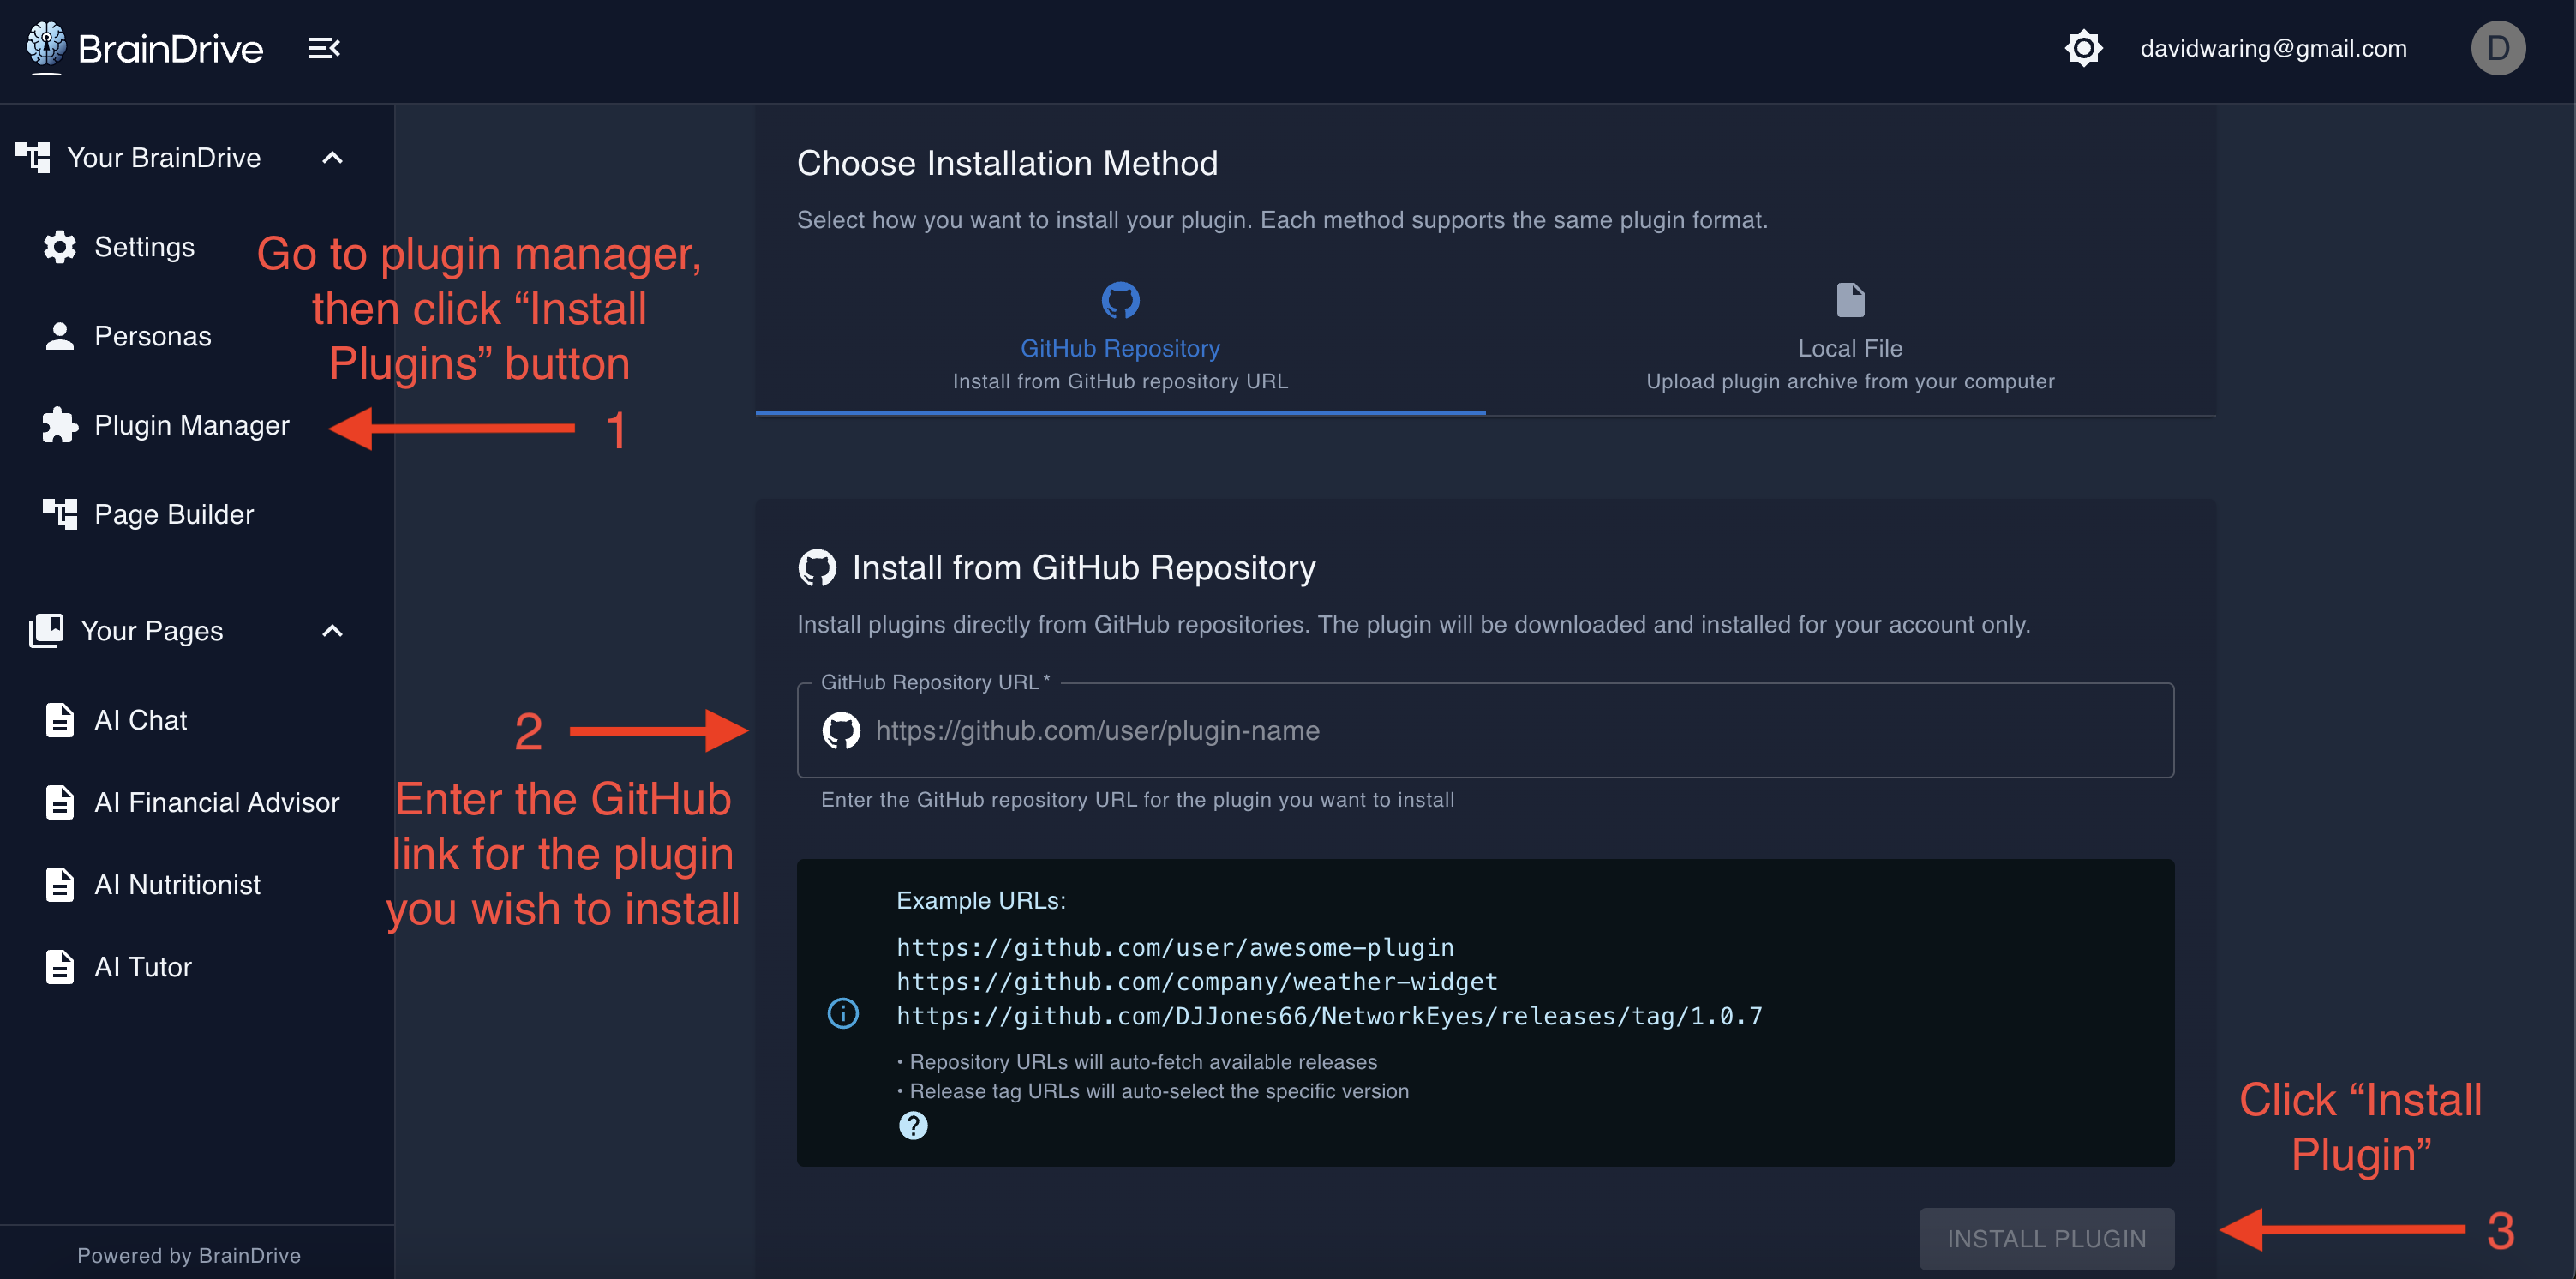
Step 2: Install the Plugin Template
- Go to BrainDrive Plugin Manager → Install Plugins
- Enter URL: `https://github.com/BrainDriveAI/BrainDrive-PluginTemplate
- Click Install
- Wait for green success message
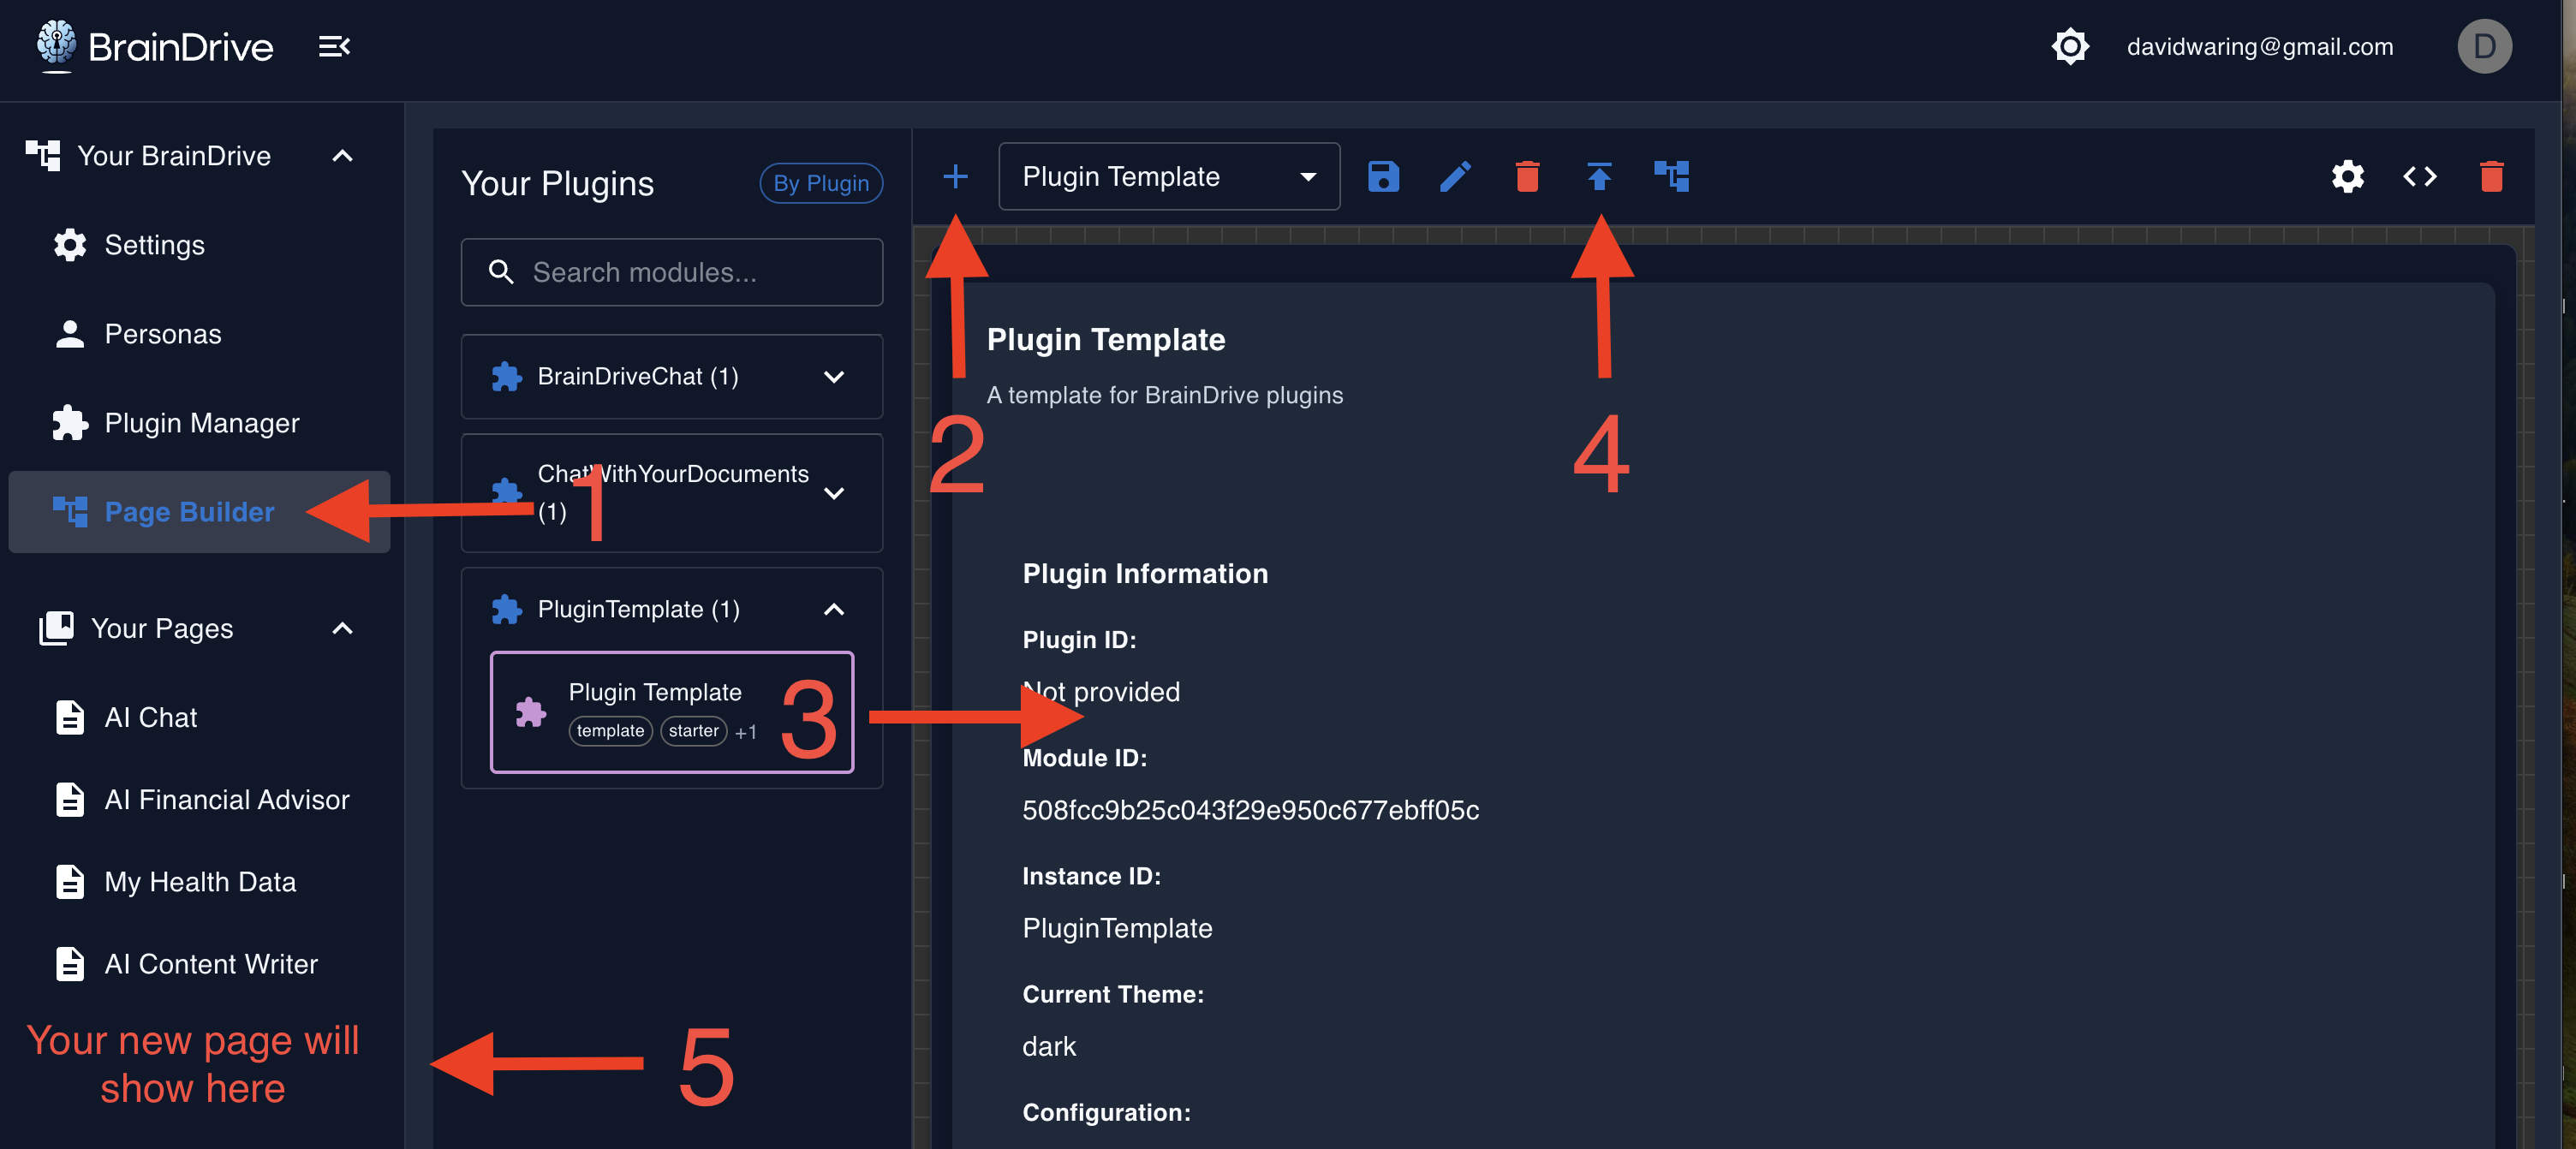
Step 3: Test the Template
- Go to BrainDrive Page Builder
- Create New Page
- Drag "Plugin Template" from left panel to canvas
- Click Publish
- Navigate to your page - you should see the working plugin
Step 4: Set Up Fast Development Environment
Clone the template:
# In your preferred development folder
git clone https://github.com/BrainDriveAI/BrainDrive-PluginTemplate.git MyPlugin
cd MyPlugin
npm install
Configure for instant updates (avoiding 10+ minute reinstall cycles):
-
Find your BrainDrive backend path:
- Look for:
[your-braindrive-path]/backend/plugins/shared/
- Look for:
-
Update webpack config:
- Open
webpack.config.js - Find the commented webpack output path
- Uncomment and update with your backend path:
output: {
  path: path.resolve(__dirname, '/path/to/your/BrainDrive-Core/backend/plugins/shared/PluginTemplate/v1.0.0/dist'),
  // ... rest of config
} - Open
-
Set up browser for cache-free development:
- Open browser dev tools (F12)
- Go to Network tab
- Check "Disable cache"
- Keep dev tools open while developing
Step 5: Make Your First Change
-
Edit the plugin:
# Open src/BrainDrive-PluginTemplate.tsx
# Change the title to "My Awesome Plugin!!" -
Build and test:
npm run build
# Refresh browser with Ctrl+F5 -
See instant results:
- Your change appears immediately in BrainDrive
- No reinstallation needed
You've just experienced the 1-minute development cycle!
Step 6: Understand Service Bridges (The BrainDrive Secret Sauce)
Why Service Bridges matter:
- Zero Dependencies - Your plugins never break when BrainDrive updates
- Simple APIs - Complex backend operations become one-line calls
- Consistent Interface - Same patterns across all BrainDrive features
Available Bridges
Each bridge comes with an example plugin you can install and full documentation.
| Bridge | Purpose | Example Use | Learn by Doing |
|---|---|---|---|
API | Backend communication | await services.api.get('/data') | API Example |
Event | Plugin messaging | services.event.emit('myEvent', data) | Events Example |
Theme | Light/dark mode switching | services.theme.getCurrentTheme() | Theme Example |
Settings | User preferences | `services.settings.getSetting('myKey') | Settings Example |
Page Context | Current page info | services.pageContext.getContext() | Context Example |
Plugin State | Data persistence | services.pluginState.save(data) | State Example |
Step 7: Build Something Simple
See the complete Lifecycle Manager Customization Guide for all customization options.
Pick a bridge, test a simple use case, and actually build something. Don’t overthink it. If the abstraction doesn’t make sense, isolate it. If it does, use it and move on.
Recommended first projects:
Hello AI Chat
// Simple AI interaction using API bridge
const response = await this.props.services.api.post('/chat', {
  message: userInput,
  model: 'gpt-4'
});
Theme-Aware Widget
// React to theme changes
componentDidMount() {
  this.props.services.theme.addThemeChangeListener(this.handleThemeChange);
}
Cross-Plugin Messaging
// Send messages between plugins
this.props.services.event.emit('dataUpdate', { newValue: 42 });
Step 8: Bring your AI powered ideas to life
The only limit is your imagination. Your AI. Your Rules.
Dave J's Rules for Success
- Test the unmodified template first - Always verify the base works before customizing
- Make incremental changes - Test after each small modification
- Use the 1-minute cycle - Don't fall back to slow reinstall cycles
- Leverage Service Bridge examples - Copy working patterns rather than starting from scratch
Have Questions?
- Community Forums - Get help and share plugins
- API Documentation - Backend endpoints (when running locally)
- Report Issues - Use
[plugin]tag
Thank you for joining us on this mission to build a superior, user-owned alterantive to Big Tech AI systems.
Your AI. Your Rules.